


How-To Import Records Into CardExchange® Controller
In most situations, the records that are available within the Controller coming from external sources such as student registrations and the HR system. Besides these, normally scheduled, processes via connectors, our import tool helps you add records to your database in the Controller by uploading a comma-separated value file (CSV). It is possible to import a maximum of 5,000 records at a time.
In this article, you will learn the basics of importing records to a database in CardExchange® Controller. With a very intuitive wizard with clear steps, importing records is easy and secure!
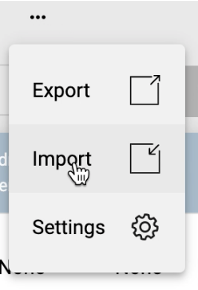
To import records into the Controller, click on the three dots button in the main People page, and click on “Import”.
When the Import page is opened, you will be asked to upload a comma-separated value file (CSV) from the file explorer. Note that to make sure every field is being mapped to suit your needs, you need to use the configure feature.

After uploading the CSV file, your records information will be shown in the window. On the right side, you see three options:
- Cancel: If there is a mistake on the file in which you don’t wish to upload, you can click on this option.
- Configure: Each section will have specific items that you can configure. You can define what type of attributes need to store with the records here.
- Upload: Click on this button to import the records.
When everything is handled, you will be returned to the People overview page, and you should have all newly imported records by then!
Go ahead and give it a go!